Are you considering Red Hat CodeReady Containers (CRC) for your local OpenShift development? Are you going to install CRC on Linux? In this blog, I am going to walk you through the deployment of CRC on Linux. We will take a closer look at how CRC works and review some of the configuration options. Fasten your seatbelts, the tour begins.
This blog uses CRC version 1.21.0, which is based on OpenShift Container Platform (OCP) version 4.6.9. I am installing CRC on Debian 10 GNU/Linux but any modern Linux distribution like Fedora or Ubuntu will do. As of version 1.21.0, CRC can be deployed on a Linux host that meets the following requirements:
- KVM and libvirt installed
- Networking configuration is managed by the NetworkManager
- User installing CRC has sudo access to the Linux host
In addition to the Linux host, you will also need to download the CRC distribution tarball and a pull secret. The pull secret is a JSON file that includes the authentication information for accessing protected container image registries that are hosted by Red Hat. If you are not a Red Hat customer, you can join the Red Hat Developer Program and download the pull secret at no cost. Through the Developer Program you can also obtain the CRC distribution tarball. Alternatively, you can download the CRC distribution tarball directly from here.
CRC comes with excellent documentation which is being expanded with every new release. You can find it here.
CodeReady Containers deployment overview
From a high-level perspective, CRC creates a virtual machine that runs a single-node OpenShift cluster. This node plays the role of a master and a worker node at the same time. No OpenShift installation takes place while deploying CRC. Instead, CRC launches OpenShift from a pre-installed virtual machine image. The diagram below depicts the CRC deployment:
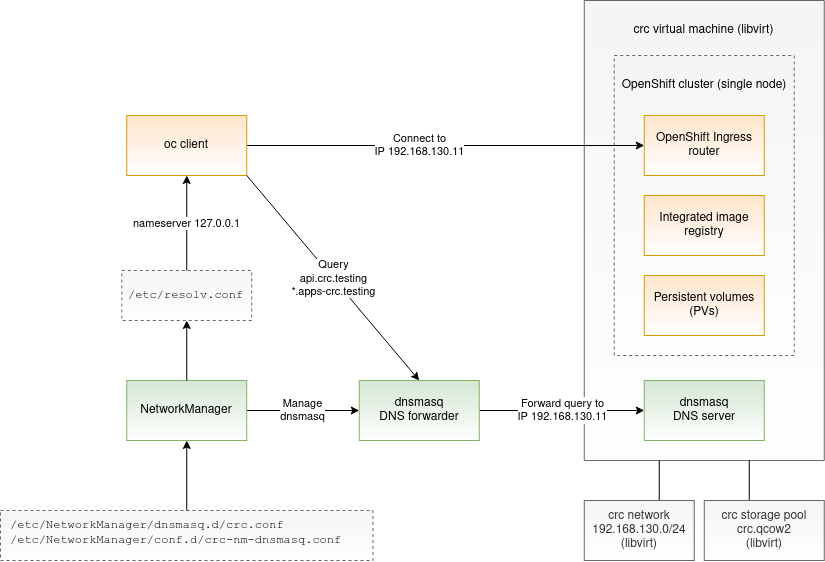
On the Linux host, CRC makes use of libvirt to create a network, storage pool, and a CRC virtual machine. The virtual machine’s data is persisted on the libvirt volume which ensures that the objects created by the user in OpenShift will survive CRC restarts.
The OpenShift instance comes with a fixed set of PersistentVolumes. Users can attach these volumes to the application pods by creating PersistentVolumeClaims (PVC). All of the volume access modes are supported: ReadWriteOnce, ReadWriteMany, and ReadOnlyMany. The content of the persistent volumes is saved on the host and can be found in the /var/mnt/pv-data directory.
How about the integrated image registry? The image registry in OpenShift is backed by a PersistentVolume and is exposed via a public route default-route-openshift-image-registry.apps-crc.testing. Users can use this route to push their container images to the registry before launching them on OpenShift.
The last thing to note in the diagram is the DNS configuration. Why is this needed? CRC configures the DNS resolution on the Linux host so that the connections to the endpoints api.crc.testing and *.apps-crc.testing are routed to the OpenShift instance. NetworkManager, which is a requirement for CRC to work, is used to achieve this DNS configuration. CRC instructs the NetworkManager to spin up a dnsmasq instance, which forwards the DNS queries for the OpenShift endpoints to the second dnsmasq instance which was deployed inside the virtual machine. This second dnsmasq instance actually resolves the queries.
Configuring CodeReady Containers
In this section, we are going to review several CRC configuration options that you may want to customize. By default, the CRC virtual machine is provisioned with 4 vCPUs, 8790 MiB RAM, and 31 GiB disk space. Depending on your use case, you may want to increase these values. On my desktop, I like to bump up the number of vCPUs to 10. Using the crc command, it can be accomplished this way:
| |
The default memory size of 8790 MiB seems rather small to me. Most of the memory is used by the OpenShift components. Out of the 8790 MiB of memory, only about 2 GiB remain available for your applications. As I have plenty of memory available on my desktop computer, I increase the memory size to some 46 GiB:
| |
Regarding the disk space, the CRC virtual machine comes with a 31 GiB disk by default. About half of this capacity is not available as it is used by the Red Hat CoreOS operating system and OpenShift components. Around 16 GiB remains available to cover the storage needs of the integrated image registry and any other volumes (PVCs) that you create for your applications. The default 31 GiB disk provides a good amount of space, however, I like to increase the disk size to 120 GiB just to match the default disk size of OCP clusters. Note that CRC allows you to increase the disk size any time after the installation as well. To increase the disk size to 120 GiB, issue the command:
| |
CRC requires an OpenShift pull secret. I like to point the CRC to my OpenShift pull secret which I store in a protected location in my home directory. This pull secret is required by OpenShift regardless of which method is used to deploy OpenShift. The same pull secret used for CRC can be used for installing OpenShift via the OpenShift installer. After I downloaded the pull secret from the Red Hat site and saved it at ~/.mysecrets/ocp/pull-secret.json, I then need to tell CRC where to find it:
| |
One final configuration option I like to set is consent-telemetry. Setting this option upfront prevents CRC from asking interactively: “Would you like to contribute anonymous usage statistics [y/N]”:
| |
CRC saves the above settings in ~/.crc/crc.json. If you prefer, you can also edit this JSON file directly. The full list of available configuration options can be obtained by typing:
| |
With the CRC configuration squared away, we are ready to prepare the Linux host for launching an OpenShift cluster.
Setting up CodeReady Containers
In this section, we are going to prepare the Linux host for launching the CRC virtual machine. Note that this is a one-time setup. Go ahead and issue the following command to begin the setup process:
| |
While the setup is running, let’s talk about the CRC binary. Did you notice that the CRC binary is quite large? The size of the CRC binary version 1.21.0 is around 2.6 GiB. Why is that? To answer this question, check out the binary structure that is depicted in the following diagram:
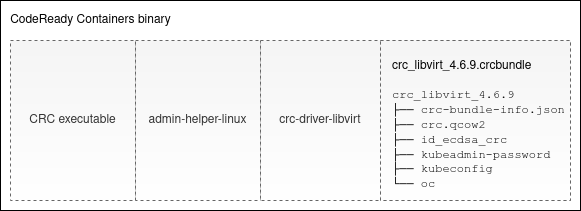
The CRC binary consists of four parts. The first part is the CRC executable. The second part is the admin-helper-linux utility that is used for updating the /etc/hosts file. After that comes the crc-driver-libvirt daemon executable, which implements functions specific to the libvirt virtualization and abstracts the virtualization details away from the CRC core. Finally, the so-called CRC bundle (crc_libvirt_4.6.9.crcbundle in the diagram) is the last part of the CRC binary. This bundle contains a virtual machine image and accounts for the majority of the size of the CRC binary.
Now let’s get back to the CRC setup. At the initial stage, the ./crc setup command extracts all the components appended to the CRC executable and places them below the ~/.crc directory. The embedded CRC bundle is a tar.xz archive whose contents is immediately decompressed into ~/.crc/cache. This bundle contains the following files:
- The
crc-bundle-info.jsoncarries the bundle metadata. CRC refers to it throughout the deployment process. - The virtual machine image
crc.qcow2contains a pre-installed OpenShift node. This image will be used as a backing image for the CRC virtual machine’s disk image. - The
id_rsa_crcbootstrap key is used by CRC for SSHing into the virtual machine at its first start. After connecting to the virtual machine, CRC generates a new unique SSH key pair and adds it to the machine’s~core/.ssh/authorized_keysfile. The original bootstrap SSH key is removed from this file, and hence can no longer be used to access the virtual machine. - The
kubeadmin-passwordfile holds the password of the kubeadmin user on OpenShift. - The
kubeconfigfile allows logging into OpenShift as user kube:admin. It includes the user’s private key that is needed for successful authentication. - The
ocexecutable is an oc client whose version matches the version of the bundled OpenShift cluster.
After the extraction of the CRC components is complete, the ~/.crc directory looks like this:
| |
The next notable step carried out by the CRC setup is configuring DNS on the Linux host. CRC configures DNS, so that the connections to the endpoints api.crc.testing and *.apps-crc.testing are routed to the OpenShift instance. It is known ahead of time that this OpenShift instance is going to expose its endpoints on a hard-coded IP address 192.168.130.11. So, how does CRC ensure the proper DNS resolution of the OpenShift endpoints? To achieve that, CRC creates a /etc/NetworkManager/conf.d/crc-nm-dnsmasq.conf file with the following configuration:
| |
This configuration instructs the NetworkManager to first, spin up a dnsqmasq instance, and second, modify the /etc/resolv.conf on the machine to use this instance as a default DNS server. In the next step, CRC configures the dnsmasq server by creating a /etc/NetworkManager/dnsmasq.d/crc.conf configuration file with the following content:
| |
This forwards DNS queries for the crc.testing and apps-crc.testing domains plus all their subdomains to the DNS server 192.168.130.11. This DNS server will be deployed inside the CRC virtual machine and will be handling the resolution of the OpenShift endpoints.
Note that the dnsmasq forwarder as described above is only created if your host doesn’t use systemd-resolved for DNS resolution. If your host uses systemd-resolved, then CRC will configure the forwarding in systemd-resolved instead of spinning up the additional dnsmasq forwarder.
The last step executed by the ./crc setup command is creating a libvirt network. What needs to be done here? CRC creates a libvirt network called crc of type NAT. The only host on the network will get the IP address 192.168.130.11:
| |
52:fd:fc:07:21:82. The above configuration assigns the fixed IP address 192.168.130.11 to this virtual machine. Both the MAC address 52:fd:fc:07:21:82 and the IP address 192.168.130.11 are hard-coded in CRC.Creating the libvirt network was the last setup step that I wanted to discuss. In the next section, we are going to create and launch the CRC virtual machine.
Starting CodeReady Containers
After the ./crc setup completes, issue the following command to create and start the CRC virtual machine:
| |
Note that if the CRC machine already exists, the above command will just start it. In the remainder of this section, I am going to discuss some of the notable steps executed during the start process.
First, CRC runs the pre-flight checks that were also executed previously by ./crc setup command. This is to ensure that the environment is still in a good shape.
Next, CRC creates a libvirt storage pool called crc in the directory ~/.crc/machines/crc. In this storage pool, a new machine image is created which is called crc.qcow2 and has the size of 120 GiB. We chose the 120 GiB size by configuring the disk-size parameter in the configuration section above. The image is thin-provisioned, i.e. no disk capacity is allocated ahead of time. Instead, additional space allocation occurs on demand as data is written to the disk. Also, CRC supports resizing the image. If the user decides to change the disk-size parameter, CRC will resize the machine image accordingly before starting the virtual machine. The libvirt storage pool definition looks something like this:
| |
After the virtual machine disk is ready, CRC will create a virtual machine and start it. The virtual machine is called crc and you can review its definition by issuing:
| |
The virtual machine’s vCPU and memory are sized according to the cpus and memory configuration we made above. In the machine definition, you can see that the virtual machine runs off the image that was created at ~/.crc/machines/crc/crc.qcow2. This image is actually an overlay image created on top of the ~/.crc/cache/crc_libvirt_4.6.9/crc.qcow2 backing image. The overlay image starts as an empty image and records changes made to the disk of the CRC virtual machine. All the changes made in the CRC virtual machine are persisted in the overlay image and will survive the virtual machine restarts. That means that your OpenShift configuration will persist across the ./crc stop and ./crc start commands.
Next, CRC creates a new SSH key pair that will be used for SSHing to the virtual machine as user core. The public key from this key pair is added to the ~core/.ssh/authorized_keys file in the virtual machine to enable the access. CRC uses SSH to further configure the virtual machine during the start.
If the user changed the disk-size parameter, the file system needs to be enlarged to span the full disk size. This is achieved by executing the xfs_growfs / command inside the virtual machine. CRC comes with the default disk size of 31 GiB. At this point, the file system is expanded to the 120 GiB that we configured above.
Next, CRC starts a DNS server — a podman container running dnsmasq — inside the virtual machine. This DNS server resolves the domain names *.apps-crc.testing, api.crc.testing, and api-int.crc.testing to the IP address 192.168.130.11, which is the address of the virtual machine itself. These domain names are assigned to the well-known OpenShift endpoints: ingress router, API server, and internal API, respectively. The DNS server is used both by the virtual machine as well as by the Linux host. The Linux host reaches the DNS server through the DNS forwarder as we described before.
During the start phase, CRC adds the following line to /etc/hosts on the Linux host:
| |
I am not sure why this setting is being done. The resolution of the above domains is already handled by the dnsmasq server running inside the CRC virtual machine. Anyway, it is good to know that CRC adds this line to your /etc/hosts.
In the next step of the start sequence, CRC starts the kubelet service which in turn brings up OpenShift services. If the kubelet’s client certificate expired while the CRC virtual machine was down, kubelet will issue a Certificate Signing Request (CSR) to obtain a new certificate. CRC checks for the presence of any new CSRs and automatically approves them.
As the last step, CRC adds the user’s pull secret to the OpenShift cluster.
The configuration related to the particular CRC machine instance is stored in the .crc/machines/crc directory. You can check it out using:
| |
Congratulations, your OpenShift instance is now up and running!
CodeReady Containers convenience commands
In this section, I would like to mention a couple of commands that are useful when working with CRC. First, you can open OpenShift Web Console in the default browser by issuing:
| |
You can always display the OpenShift user credentials by running:
| |
You can SSH into the CRC virtual machine as the user core:
| |
core user has full administrative privileges via sudo.Conclusion
This blog covered the deployment of CodeReady Containers to a Linux host. We began by reviewing the prerequisites that are needed to deploy CRC. In the deployment overview section, we showed how CRC interacts with libvirt to spin up the OpenShift virtual machine. We also discussed the DNS configuration made by CRC. Before deploying CRC, we customized the CRC configuration and provided the virtual machine with additional resources beyond the factory defaults. We discussed the CRC setup and start phases in great detail. Finally, I shared some of the convenience commands I like to use.
Update 3/29/2021: I also have a video related to this topic, it can be found here.
Hope you enjoyed the CodeReady Containers tour presented in this blog. If you have any questions or comments, please leave them in the comment section below. I look forward to hearing from you!