Pods on Kubernetes are ephemeral and can be created and destroyed at any time. In order for Envoy to load balance the traffic across pods, Envoy needs to be able to track the IP addresses of the pods over time. In this blog post, I am going to show you how to leverage Envoy’s Strict DNS discovery in combination with a headless service in Kubernetes to accomplish this.
Overview
Envoy provides several options on how to discover back-end servers. When using the Strict DNS option, Envoy will periodically query a specified DNS name. If there are multiple IP addresses included in the response to Envoy’s query, each returned IP address will be considered a back-end server. Envoy will load balance the inbound traffic across all of them.
How to configure a DNS server to return multiple IP addresses to Envoy? Kubernetes comes with a Service object which, roughly speaking, provides two functions. It can create a single DNS name for a group of pods for discovery and it can load balance the traffic across those pods. We are not interested in the load balancing feature as we aim to use Envoy for that. However, we can make a good use of the discovery mechanism. The Service configuration we are looking for is called a headless service with selectors.
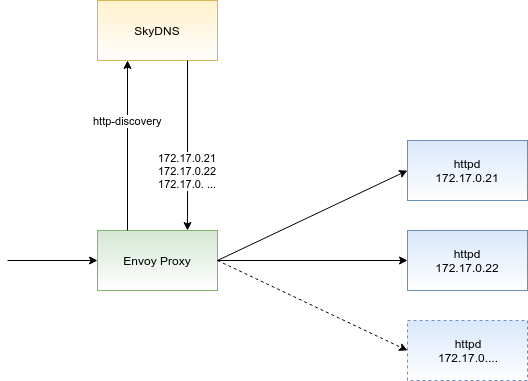
The diagram below depicts how to configure Envoy to auto-discover pods on Kubernetes. We are combining Envoy’s Strict DNS service discovery with a headless service in Kubernetes:

Practical implementation
To put this configuration into practice, I used Minishift 3.11 which is a variant of Minikube developed by Red Hat. First, I deployed two replicas of the httpd server on Kubernetes to play the role of back-end services. Next, I created a headless service using the following definition:
| |
Note that we are explicitly specifying “None” for the cluster IP in the service definition. As a result, Kubernetes creates the respective Endpoints object containing the IP addresses of the discovered httpd pods:
| |
If you ssh to one of the cluster nodes or rsh to any of the pods running on the cluster, you can verify that the DNS discovery is working:
| |
Next, I used the container image docker.io/envoyproxy/envoy:v1.7.0 to create an Envoy proxy. I deployed the proxy into the same Kubernetes namespace called mynamespace where I created the headless service before. A minimum Envoy configuration that can accomplish our goal looks as follows:
| |
Note that in the above configuration, I instructed Envoy to use the Strict DNS discovery and pointed it to the DNS name httpd-discovery that is managed by Kubernetes.
That’s all that was needed to be done! Envoy is load balancing the inbound traffic across the two httpd pods now. And if you create a third pod replica, Envoy is going to route the traffic to this replica as well.
Conclusion
In this article, I shared with you the idea of using Envoy’s Strict DNS service discovery in combination with the headless service in Kubernetes to allow Envoy to auto-discover the back-end pods. While writing this article, I discovered this blog post by Mark Vincze that describes the same idea and you should take a look at it as well.
This idea opens the door for you to utilize the advanced features of Envoy proxy in your microservices architecture. However, if you find yourself looking for a more complex solution down the road, I would suggest that you evaluate the Istio project. Istio provides a control plane that can manage Envoy proxies for you achieving the so called service mesh.
Hope you found this article useful. If you are using Envoy proxy on top of Kubernetes I would be happy to hear about your experiences. You can leave your comments in the comment section below.
