It has been 18 months since we deployed OpenStack cloud in our company. In this article, I would like to review our time with OpenStack and describe some of the experience we gained. Are you thinking about building an OpenStack-based cloud? This article might provide you with additional insights and tips that will help you succeed.
Introduction
Right at the beginning, I’d like to say that our company is not a cloud provider. We didn’t build a cloud to provide a service to customers. Instead, we built a private cloud to support our engineering team in their software development efforts. Our OpenStack is running development machines, build machines and test machines. The requirements on the availability and reliability of our OpenStack cluster are therefore lower than the requirements that a public cloud would have to meet.
We started evaluating OpenStack around the Kilo release and ended up going with Mitaka into production. Around that time, Internet was flooded with articles criticizing the complexity of OpenStack including scary stories of companies failing their OpenStack projects. I can confirm that deploying OpenStack was a real challenge and that as we were working on it, the OpenStack version of the Kennedy’s famous words passed through my mind several times:
We choose to deploy OpenStack not because it is easy, but because it is hard.
However, nothing can scare away a proficent software practitioner. Eventually, we got the job done and the invested effort did pay off.
OpenStack essentials
OpenStack is an open-source infrastructure-as-a-service (IaaS) cloud platform. It’s important to understand that OpenStack itself is only a controlling layer that relies on other software projects to provide the implementation of the underlying functionality. For instance, OpenStack can spin up virtual machines, however, you would not find any code in the OpenStack project that would actually implement a hypervisor. Instead, OpenStack integrates with an existing hypervisor software to do the job. A very popular choice of the hypervisor used along with OpenStack is KVM and so when the user creates a virtual machine on OpenStack, OpenStack merely calls the KVM hypervisor to spin up the virtual machine. The same holds true for other areas of OpenStack functionality like networking and storage where OpenStack drives the underlying networking and storage software to do the actual job.
When planning an OpenStack cluster, you will have to choose from a variety of underlying technologies. For instance, in addition to the KVM hypervisor, OpenStack also supports Xen, VMware vSphere and Hyper-V. Most of the time you will just pick the technology you already run at your place and for which you have the staff to manage it. The freedom of choice you have with OpenStack is amazing, however, I would recommend to always look at the most popular choices first because their integration with OpenStack tends to be more solid. In our case, we chose KVM as a hypervisor, Open vSwitch as a networking implementation and Ceph to provide object and block storage.
OpenStack is an umbrella project under which you can find a host of projects each dealing with a different portion of the cloud functionality. The core projects that one can find installed in the majority of OpenStack deployments are:
- Nova. Manages virtual machines.
- Neutron. Provides networking to virtual machines.
- Cinder. Provides block storage that can be attached to virtual machines.
- Glance. Stores virtual machine images.
- Horizon. Web-based user interface to OpenStack services.
- Keystone. Identity service.
Additionally, project Heat, Swift, and Ceilometer are also rather popular. You can find plenty of other OpenStack projects listed on the Project navigator page. When choosing OpenStack projects for your deployment, you should always consider the adoption and the maturity of the projects. Many projects on the list are still in the early stages of development and not ready for production use.
OpenStack was designed for massive scale deployments as you can tell if you look at the OpenStack architecture diagram. Each OpenStack project consists of multiple services (daemons) that can be deployed on separate physical machines allowing OpenStack to scale out. OpenStack services communicate with each other over the network using RESTful APIs. In addition, some of the projects like Nova, Neutron and Cinder chose to leverage a message broker for internal communication. The high number of services that form an OpenStack deployment contributes to its operational complexity.
Getting started with OpenStack
If you are new to OpenStack, a great place to start learning OpenStack is the DevStack project. DevStack allows you to create an all-in-one deployment of OpenStack. With DevStack you can access debug logs of individual OpenStack services as well as easily restart OpenStack services after you changed their configuration. It took me a while to figure out which configuration option affects which OpenStack service and how OpenStack services communicate with each other. I learned a lot by re-deploying DevStack many times, trying to make the individual OpenStack features work properly.
OpenStack is a fast moving project with two major releases per year. Especially in the past, the project documentation could not keep up with the many changes packed in each release. The documentation was outdated on many places or was missing altogether. When working with OpenStack I quickly realized that reading the OpenStack’s Python code was necessary in order to understand how some of the configuration options worked or when troubleshooting various issues.
Ability to read the OpenStack source code was required to succeed.
OpenStack is written using a beautiful idiomatic Python code which was most of the time a pleasure to read. At first, I started walking through the code of simpler projects like Glance and learned the patterns that were commonly used in other OpenStack projects, too. Only later I dived deeper into the internals of Nova, the OpenStack’s brain that schedules and creates virtual machines. When between OpenStack releases configuration options were renamed or moved to different INI file sections, I just grepped through the source code and learned about the changes avoiding any further frustration.
If you are getting started with OpenStack, prepare for a steep learning curve. Apart from studying the OpenStack project documentation, you will have to refer to the documentation of the technologies that you integrate with OpenStack, too. For instance, I spend quite a bit of time studying the documentation of RabbitMQ, libvirt, Open vSwitch, and Ceph.
Choosing an OpenStack distribution
There are several OpenStack distributions available out there. For us the choice was pretty straight forward. As we are a Red Hat shop, we went with RDO installed on top of RHEL7. I spent large amounts of time working with RDO and yeah, it was challenging, at least in its Mitaka release. For further details on our experience with OpenStack RDO, you can refer to articles: 1, 2. Due to the complexity of OpenStack, it is rather difficult to create a tool to manage its life-cycle and I’m certain that further development effort will have to be spent before reaching perfection.
By the way, some OpenStack distributions come with a GUI-based installer. As there are dozens of configuration parameters to set during the installation, I don’t see the point of using a graphical interface to do this. Instead, a well commented configuration file seems more desirable to me. Does the GUI-based installer enable product managers to make a check mark on their data sheet? I would say yes, but you can safely ignore it when choosing your OpenStack distribution.
Choosing server hardware
We started with a small OpenStack deployment comprised of 3 controller nodes, 2 compute nodes and 3 Ceph nodes. Over time, we added further nodes to meet the growing demand and ended up with the current size of the cluster being 3 controller nodes, 13 compute nodes and 7 Ceph nodes. Majority of the nodes are HP ProLiant DL360 Gen9 machines with the following hardware parameters:
- Controller nodes. 96GB RAM, 2 x 300GB SAS 10K HDD in RAID1, 1Gbit Ethernet NICs
- Compute nodes. 288GB RAM, 8 x 300GB SAS 10K HDD in RAID10 (for the OS + instance ephemeral storage), 1Gbit and 10Gbit Ethernet NICs
- Ceph nodes. 32GB RAM, 2 x 300GB SAS 10K HDD in RAID1 (for the OS), 6 x 1.2TB SAS 10K HDD (Ceph OSD storage drives), 1Gbit and 10Gbit Ethernet NICs
1Gbit Ethernet NICs are used to access OpenStack APIs on the controller nodes. Compute nodes and Ceph storage nodes are interconnected using 10Gbit Ethernet. All network interfaces are bonded and connected to two different switches to avoid a single-point-of-failure. There is a dedicated 1Gbit link attached to each of the OpenStack nodes used for node management via SSH.
From our experience, each of the compute nodes can run up to 40-50 virtual machines using the default OpenStack RDO settings: cpu_allocation_ratio=16.0, ram_allocation_ratio=1.0 and disk_allocation_ratio=1.0. Our current limit preventing us to achieve even higher density is the amount of provisioned RAM on the nodes. In the future, we are considering adding more RAM to the compute nodes or increasing the ram_allocation_ratio.
Deployment overview
Finally, we are going to take a look at the high-level overview of our OpenStack deployment. In the diagram below you can see the OpenStack projects that we chose for the deployment:
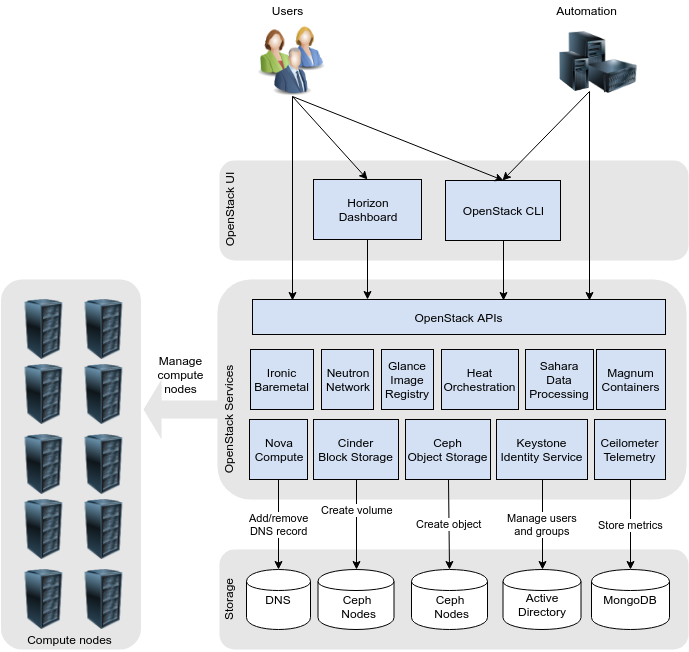
Let me comment on some of the projects we deployed:
- Ironic. We deployed Ironic in order to manage baremetal machines that we use for performance testing. Performance tests are more accurate when carried out in an isolated baremetal environment than on the virtual machines that share the resources of the hypervisor. To this date we didn’t realize this our plan but we will get back to it in the future.
- Magnum. Magnum project simplifies the deployment of container orchestrators like Kubernetes, Swarm and Mesos on top of OpenStack. To accomplish this, Magnum leverages Heat templates behind the scenes and the actual provisioning is done by Heat. To be honest, we never really started using Magnum. When deploying Kubernetes, we preferred to use Heat templates provided by the Kubernetes project. This approach turned to be more straight forward than involving yet another service like Magnum. You can read about it here.
- Sahara. Sahara project allows you to deploy big data frameworks like Apache Hadoop and Apache Spark on top of OpenStack. We made similar experience with Sahara as we made with Magnum. We just didn’t start using it at all. It turned out that there were already pre-existing deployment scripts provided by Hortonworks and others that it made no sense for us to use Sahara. While Hortonworks scripts can deploy Hadoop on any of the major clouds, Sahara would be an OpenStack-only solution.
- Manila. While not depicted in the diagram, we also deployed OpenStack Manila. Manila is a shared file system service and we use it to provision NFS shares. Manila project started as a code copy of the Cinder project and perhaps that’s why it was pretty stable and usable soon after its inception. I wrote an article about Manila at the time we were evaluating it.
- Designate. Designate is a DNS as a service for OpenStack. After evaluating this project, we realized that for our simple purpose Designate was too involved. We ended up writing a Python script that dynamically registers OpenStack virtual machines with our internal DNS server. This script works reliably ever since and you can read about it in this blog post.
Conclusion
In this post, we described some of our experience with planning the OpenStack cloud and deploying it. In the second blog post, we are going to share the lessons learned when operating OpenStack.
If you have battle scars from working with OpenStack, I would love to hear from you. Please, feel free to share your comments and stories in the comment section below.