Update 6/19/2018: The openstack-heat kube-up provider used in this tutorial was removed in Kubernetes version 1.10. If you want to install Kubernetes 1.10 or later on OpenStack, this tutorial won’t help you.
Want to install Kubernetes on top of OpenStack? There are many ways how to install a Kubernetes cluster. The upcoming Kubernetes 1.3 release comes with yet another method called OpenStack Heat. In this article, we’re going to explore this deployment method when creating a minimum Kubernetes cluster on top of OpenStack.
In this tutorial, there are three OpenStack virtual machines involved. The first machine, called the Kubernetes installer machine, is created manually and is used for compiling Kubernetes from source and running the Kubernetes installer. The other two OpenStack machines, Kubernetes master and Kubernetes node, are created during the installation process.
The Kubernetes installer machine and both of the Kubernetes machines run on the CentOS-7-x86_64-GenericCloud-1605 image. You can download this image from the
CentOS image repository. After I uploaded the CentOS 7 image into OpenStack, it has been assigned ID 17e4e783-321c-48c1-9308-6f99d67c5fa6 for me.
Building Kubernetes from source
First off, let’s spin up a Kubernetes installer machine in OpenStack. I recommend using the m1.large flavor that comes with 8 GB of RAM. The compilation of Kubernetes is rather memory intensive.
To ensure consistent and reproducible builds, a Docker container is created at the beginning of the build process and the build proceeds within the container. So, let’s quickly setup Docker on our build machine:
| |
Configure the Docker service to start on boot and then start it:
| |
The Kubernetes build scripts expect that the docker command can successfully contact the Docker daemon. In the default CentOS configuration, the sudo docker is required in order to connect to the /var/run/docker.sock socket which is owned by the user root. To overcome the permission problem, let’s create a wrapper script that will invoke the docker command using sudo:
| |
You can test your changes with the docker info command which should work now.
Kubernetes is written in the Go language and its source code is stored in a Git repository. So, let’s install the Go language environment and Git:
| |
Next we’ll clone the Kubernetes Git repository and start the build. The quick-release make target creates a build for the amd64 architecture only and doesn’t run any tests.
| |
After about 15 minutes when the build was successful, you’ll find the distribution tarballs kubernetes.tar.gz and kubernetes-salt.tar.gz in the _output/release-tars directory.
Setting up the OpenStack CLI tools
The Kubernetes installer uses the OpenStack CLI tools to talk to OpenStack in order to create a Kubernetes cluster. Before you can install the OpenStack CLI tools on CentOS 7, you have to enable the OpenStack Mitaka RPM repository:
| |
Install the OpenStack CLI tools that are used by the Kubernetes installer when creating a cluster with:
| |
Next, you have to obtain your OpenStack openrc.sh file and source it into your environment:
| |
You should be able to talk to OpenStack now. For example, check if you can list the available OpenStack networks with:
| |
Configuring the Kubernetes installer
In this section, we’re going to more or less follow the instructions found in the chapter OpenStack Heat of the Kubernetes documentation.
When deploying the Kubernetes cluster, the installer executes the following steps that you can find in cluster/openstack-heat/util.sh:
- Upload the distribution tarballs
kubernetes.tar.gzandkubernetes-salt.tar.gzinto thekubernetescontainer in Swift - Upload the virtual machine image for the Kubernetes VMs into Glance
- Add the user’s keypair into Nova
- Run a Heat script in order to create the Kubernetes VMs and put them on a newly created private network. Create a router connecting the private network with an external network.
- At the first boot, the Kubernetes VMs download the distribution tarballs from Swift and install the Kubernetes software using Salt
Let’s create an openstack-heat.sh file with the configuration values for the Kubernetes installer:
| |
The above configuration will create exactly one Kubernetes master and one Kubernetes node. It will inject the keypair called mykeypair into both of them. Note that you have to ensure that the keypair mykeypair exists in Nova before proceeding. You probably want to change the name of the external network to a network available in your OpenStack. We’re going to use the same CentOS 7 image for both of our Kubernetes VMs. This CentOS image has already been uploaded into OpenStack and in my case it was assigned ID 17e4e783-321c-48c1-9308-6f99d67c5fa6. You also want to change the IP address of the DNS server to something that suits your environment. The Swift server URL is the public endpoint of your Swift server that you can obtain from the output of the command openstack catalog show object-store.
When your configuration is ready, you can source it into your environment:
| |
Next, in my environment I had a problem where the IP range of the private network created by Kubernetes collided with the existing corporate network in my company. I had to directly edit the file cluster/openstack-heat/kubernetes-heat/kubecluster.yaml to change the 10.0.0.0/24 CIDR to something like 10.123.0.0/24. If you don’t have this problem you can safely use the default settings.
The Kubernetes cluster can leverage the underlying OpenStack cloud to attach existing Cinder volumes to the Kubernetes pods and to create external loadbalancers. For this to work, Kubernetes has to know how to connect to OpenStack APIs. With regard to the external loadbalancers, we also need to tell Kubernetes what Neutron subnet the loadbalancer’s VIP should be placed on.
The OpenStack configuration can be found in the cloud-config script cluster/openstack-heat/kubernetes-heat/fragments/configure-salt.yaml. You can see that this script will create a configuration file /srv/kubernetes/openstack.conf on the Kubernetes machine which contains the OpenStack settings. In my case, I changed the original block:
| |
to read:
| |
Besides adding the LoadBalancer section, I also appended the domain-name option to the end of the Global section, as in my OpenStack environment I want to authenticate against a non-default Keystone V3 domain.
Installing the Kubernetes cluster
After you’ve sourced both the openrc.sh and openstack-heat.sh environment settings, you can kick off the installation of the Kubernetes cluster with:
| |
After about 25 minutes, you should have a Kubernetes cluster up and running. You can check the status of the Kubernetes pods with the command:
| |
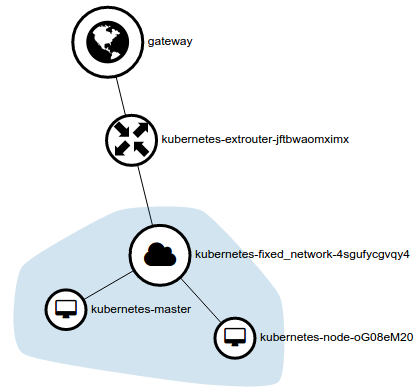
All pods should be running. The network topology of the Kubernetes cluster as displayed by Horizon:
Accessing the Kubernetes cluster
Update 9/5/2016:
At first, we will copy the kubectl client binary from the Kubernetes installer machine onto the remote host from where we are going to access our Kubernetes cluster:
| |
Remember to replace the remote.host.com with the name of your remote machine.
Next, we’re going to start a kubectl proxy to allow access to Kubernetes APIs and the web UI from the remote host. The proxy can be brought up directly on the Kubernetes installer machine using the command:
| |
The proxy listens on port 8080 on all network interfaces and accepts connections from remote hosts with any IP address. This configuration is very unsecure but is good enough for our test environment. If your Kubernetes installer machine runs on the cloud, you might want to modify the security group rules to provide access to port 8080.
Now, we can access the Kubernetes APIs from the remote machine using the command:
| |
The web UI of your Kubernetes cluster should be available at the URL:
| |
Note that you want to replace the kubernetes.installer.com with the name of your Kubernetes installer machine. When accessing the Kubernetes installer machine on port 8080, the request will be forwarded to your Kubernetes master node.