Do you like Docker technology and want to learn more about it? There’s no better way to learn than reading the source code. In this article, we’ll install the Go programming language, download the latest Docker source code and navigate through it in Eclipse.
Installing the Go programming language
The Go programming language is relatively young and sees a lot of development. Within the past two years there was a major release available every half a year. To keep up with the latest state of art it’s better to install Go packages directly from the project’s download site instead of trying to make use of the packages coming with your Linux distribution. Currently, Docker requires Go version 1.4 or later. Before you start the installation, make sure that there are no Go packages installed on your system. The following command will uninstall all Go packages from your Debian-based Linux:
| |
After you’ve downloaded the Go binary distribution tarball your can install it with:
| |
This will extract the archive into the /usr/local/go directory. The Go distributions assume they will be installed in /usr/local/go. If you install Go into a different location you’ll have to set the GOROOT environment variable. For more information on the Go installation refer to the Go’s
Getting Started page.
The /usr/local/go/bin includes the Go tool (the go command). We’ll use this tool to download and compile Docker. You want to have the Go tool available on your path:
| |
Creating a Go workspace
The Go workspace is a directory with three subdirectories:
srcis where the source code residespkgis where the libraries are storedbinis where the executables reside
Typically, Go programmers keep all their source code and dependencies (libraries) in a single workspace. It means that all your Go projects are located in a single workspace.
The workspace can be created at an arbitrary location. In order for Go tool to find the available workspaces, you must list them in the GOPATH environment variable. We’ll define a single workspace under the current user’s home directory:
| |
At the same time, we’ve included the workspace’s bin directory into our path variable. Whenever we build an executable it’ll be instantly available for us to use. Note that the workspace directory doesn’t exist yet. Go tool will automatically create it when we download the Docker source code.
Furher information on the Go code organization and workspaces can be found here.
Building Docker from source
So far, we’ve defined the location of our Go workspace. Now we’re going to download the latest Docker code and build it. The Go tool can directly download the Docker Git repository and save it into our workspace:
| |
Now we can change our directory to the cloned Git repository and start the build:
| |
Docker comes with a set of dependencies directly checked into the Docker Git repository. You can find them in the vendor directory. This directory is actually a Go workspace which we only needed to include in our GOPATH when we triggered the build. If everything went fine, you can find some generated source files in the autogen directory and the freshly built Docker executables in the bundles directory.
Creating an Eclipse project
In this section, we’re going to install a Go language plug-in into Eclipse IDE and create a Docker project. The GoClipse plug-in brings Go language support into Eclipse. The minimum installation requirements for this plug-in are: Eclipse 4.5 (Mars) running on Java 8 or later. You can follow the installation instructions available here to get the plug-in installed.
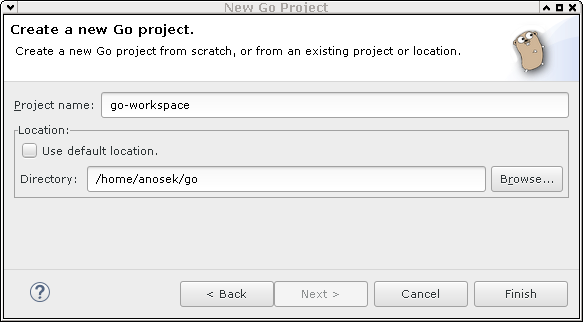
After the successful plug-in installation and restart of Eclipse select File -> New -> Project .... Choose Go Project in the dialog box. You’ll be presented with a window similar to:

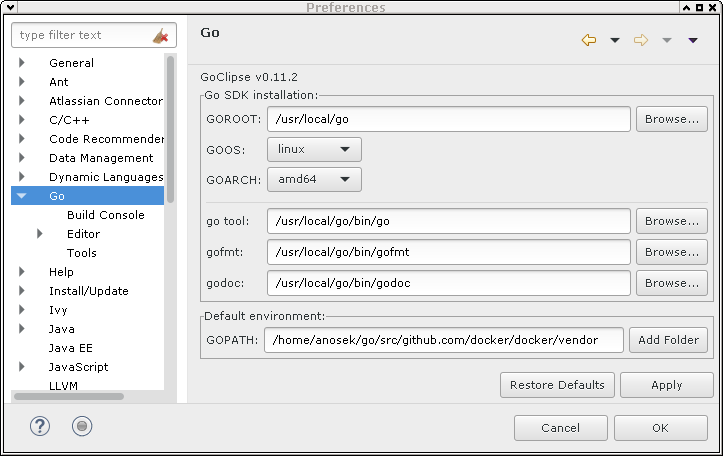
Instead of using the default location, let Eclipse create the project in your Go workspace. After your Go project has been created, go to Window -> Preferences and find the tab with the Go configuration. You want to set the location of your Go language installation to the standard /usr/local/go directory. Make sure you set the GOOS and GOARCH fields, too. You’ll also have to add the path to the Docker’s vendor directory into the GOPATH field.

Code navigation and auto-completion
In this final section, we’re going to make navigation and auto-completion in Eclipse work. The Open Definition navigation in Eclipse (keyboard shorcut F3) requires the Go oracle tool to be installed. Whenever you open the definition of the entity under the cursor, Eclipse will call the oracle tool in order to obtain the information about the navigation target.
The oracle tool is part of a bigger Go toolset located
here. You can easily install the oracle tool using the go command. Type this in your console:
| |
You can run this command to confirm that the oracle tool was installed successfully:
| |
The source code navigation in Eclipse using the F3 keyboard shortcut should start working. Let’s focus on the code auto-completion (Ctrl+Space) next. In order to make the auto-completion work, we need to install an auto-completion daemon for the Go programming language
gocode. The installation with the go tool is pretty simple:
| |
To confirm that the gocode tool was installed successfully type:
| |
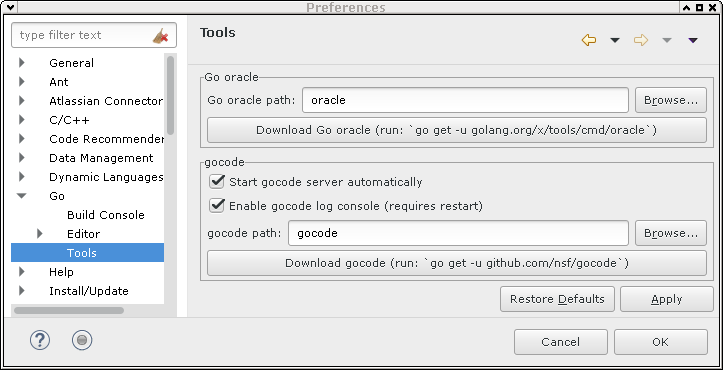
Eclipse provides a configuration dialog for Go tools under Window -> Preferences. There are even buttons to click and install the oracle and gocode tools from within Eclipse. We did this installation on the command-line.

Now that you’re all set I wish you happy browsing through the Docker source code!
