Recently I was looking for a way to implement access control for microservices. I needed a solution that would allow defining complex authorization rules that could be enforced across many services. After searching the web, I discovered a very promising Open Policy Agent project that seems to be the right tool for the job. In this series of three blog posts, I am going to introduce Open Policy Agent to you and highlight how it can help you.
What is Open Policy Agent?
Open Policy Agent (OPA) is a policy engine that can be used to implement fine-grained access control for your application. For example, you can use OPA to implement authorization across microservices. However, there is much more that can be accomplished with OPA. For your inspiration, there are several open-source projects that integrate with OPA to implement fine-grained access control like Docker, Istio and others. Furthermore, OPA as a general-purpose policy engine, can be leveraged in use cases beyond access control, for instance to make advanced pod placement decisions in Kubernetes.
OPA can be deployed as a standalone service along with your microservices. In order to protect your application, each request coming to a microservice must be authorized before it can be processed. To check the authorization, the microservice makes an API call to OPA to decide whether the request is authorized or not. Note that while you can offload authorization decisions from your application to OPA, your application still has to implement the enforcement of those decisions. For example, your application can ask OPA the question “Is user Alice allowed to invoke GET /protected/resource?” and if OPA answers “No”, your application has to send HTTP 403 Forbidden back to Alice.

OPA is written in the Go language and its source code is available on GitHub under the Apache License 2.0. The Open Policy Agent project is hosted by CNCF as an incubating project.
Making policy decisions
In this section, I am going to explain how OPA works. Don’t worry if everything is not clear to you right away. In the following section, we are going to work through a practical example which will help clarify the details.
What does it take for OPA to make a policy decision? In OPA, there are three inputs into the decision-making process:
- Data is a set of facts about the outside world that OPA refers to while making a decision. For example, when controlling access based on the access control list, the data would be a list of users along with the permissions they were granted. Another example: when deciding where to place the next pod on the Kubernetes cluster, the data would be a list of Kubernetes nodes and their currently available capacity. Note that data may change over time and OPA caches its latest state in memory. The data must be provided to OPA in the JSON format.
- Query Input triggers the decision computation. It specifies the question that OPA should decide upon. The query input must be formatted as JSON. For instance, for the question “Is user Alice allowed to invoke GET /protected/resource?” the query input would contain parameters: Alice, GET, and /protected/resource.
- Policy specifies the computational logic that for the given data and query input yields a policy decision aka query result. The computational logic is described as a set of policy rules in the OPA’s custom policy language called Rego. Note that OPA doesn’t come with any pre-defined policies. OPA is a policy engine that is able to interpret a policy, however, in order to make use of it you have to create a policy yourself and provide it to OPA.

In order to make a policy decision, all three inputs (data, query input, and the policy) are fed into the Policy Engine. The Policy Engine interprets the rules included in the policy and based on the data and the query input makes a policy decision. The policy decision generated by the Policy Engine is a JSON document.
That is how OPA works from a high-level perspective. In the next section, we will dive into a practical example.
Hands-on tutorial
This section is a hands-on tutorial where I will walk you through an example of working with OPA. Although, all sorts of access control models can be implemented using OPA, the goal of this exercise is to implement access control using an Access Control List (ACL). So, let’s get started!
Creating data
Access control list specifies which users have access to the application as well as what operations they are allowed to invoke. For the purposes of this tutorial, I came up with a simple ACL definition:
| |
According to this ACL, a user named alice was granted read and write access to the application. In addition, a user named bob was given read access. No other users were given any access to the application. For now, you can save this ACL definition as a file called myapi-acl.json.
Note that later on we are going to inject this access control list as data into OPA to allow it to make policy decisions based on this list. How did we know what the structure of the ACL document looks like? As a matter of fact, OPA doesn’t prescribe how you should structure your data. It only requires the data to be in a JSON format. The recommendation is to structure your data in a way that makes it easy to write policy rules against it. I followed this recommendation and the above access control list is what I came up with.
Defining query input
Next, we are going to define a structure of the query input. On each access to our application, we are going to ask OPA whether the given access is authorized or not. To answer that question, OPA needs to know the name of the user that is trying to access the application and the operation that the user is trying to invoke. Here is a sample query input that conveys the two query arguments to OPA :
| |
You can interpret this query input as the question: “Is user alice allowed write access to the application?”. Note that it’s up to you how you structure your query input. OPA’s only requirement is for the input to be in the JSON format.
Writing Rego policy
After we decided how our data and the query input look like, we can create a policy that implements the ACL semantics. Using the Rego language, let’s create a policy with two rules allow and whocan:
| |
The allow rule checks whether the user is allowed access according to the ACL. It instructs the policy engine to first look up the user’s record in ACL and then to check whether the operation the user is trying to invoke is included on user’s permission list. Only if there is an ACL record for the given user and the user was granted given access permission, the allow rule results to true. Otherwise it results to false.
The second rule in our policy is the whocan rule. This rule takes the operation as the input argument. For the given operation, whocan rule returns a list of all users that are allowed to invoke the given operation.
You can save the above policy as a file called myapi-policy.rego. We are going to upload it into OPA in just a moment. At this point, both the ACL file myapi-acl.json we created earlier and the policy file myapi-policy.rego are sitting in our working directory. It’s now time to put OPA to work!
Starting up Open Policy Agent service
You can grab the OPA binary for your platform (Linux, MacOS, or Windows) from GitHub. After downloading the binary, start the OPA service by issuing the command:
| |
OPA service is now up and listening on port 8181. Next, we are going to upload the ACL file and the policy file into OPA. Note that OPA stores both the data and policies in memory and so if you restart the OPA service, you will have to reload both of the files.
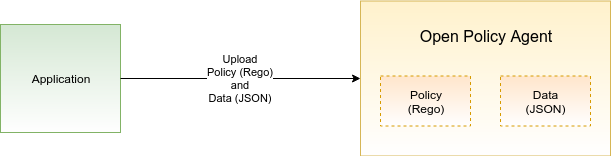
First, upload the ACL file myapi-acl.json into OPA using the following curl command:
| |
Next, upload the policy file myapi-policy.rego into OPA by issuing:
| |
Invoking policy queries
Finally, if everything went well, we are now ready to issue our first query.
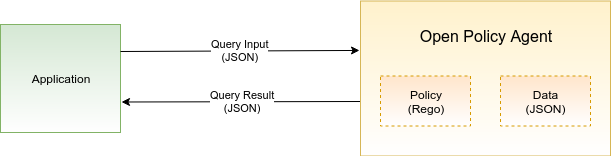
Let’s ask OPA whether the user alice can invoke a write operation on our application:
| |
The query result returned by OPA says that the user alice is authorized for writing. Our application would now proceed with executing the write operation. And what about bob? Is user bob allowed to write?
| |
The query result says it clearly. User bob is denied write access. Our application would return HTTP 403 Forbidden to bob at this point.
From what we have seen so far, a query result can be a simple true or false value. However, this is not a limitation that OPA would impose. OPA allows you to write policy rules that can yield an arbitrarily complex JSON structure. For example, the whocan rule that we defined in our policy, returns a JSON list.
Let’s give it a try and ask OPA to return a list of users that were granted the read permission:
| |
Conclusion
In this article, we took an initial look at Open Policy Agent. After discussing how OPA works, we went through an example of implementing an Access Control List policy. In the next entry to this series, we are going to dive deeper into developing policies with OPA.
I hope that you found this article useful. If you have any questions or comments, please add them to the comment section below. I look forward to hearing from you.